How to Install a Kitchen Faucet
To install a kitchen faucet, shut off the water, remove the old faucet, mount a compatible replacement, and connect its supply lines. Check the sink holes and fittings first, then restore water slowly and inspect every joint for leaks.
On this page (8 sections)
- What should you check before installing a kitchen faucet?
- How do you shut off water and remove the old faucet?
- How do you prepare and mount the new faucet?
- How do you connect the supply lines?
- How do you test the faucet for leaks?
- What are common kitchen faucet installation mistakes?
- Which supplies should you choose for your installation?
- How do you decide whether to install it yourself?
To learn how to install a kitchen faucet, check the sink holes and connections first, shut off the water, mount the faucet, and reconnect the supply lines. A careful fit check can prevent leaks and a frustrating pause under the sink.
This job is a good fit for a homeowner who can reach the mounting hardware, has working shutoff valves, and can match the new faucet to the sink. Set aside an adjustable wrench, a basin or faucet wrench, a bucket, towels, a flashlight, and the faucet instructions.
What should you check before installing a kitchen faucet?
Check the sink-hole layout, mounting instructions, shutoff valves, and supply fittings before removing the existing faucet. These details tell you whether the replacement will fit and whether you need any extra parts.
Count the holes in the sink or counter. If there are several, measure the spacing and check whether the new faucet includes a deck plate that can cover unused openings.
Compare the faucet’s mounting requirements with the sink layout before buying.
Think about clearance, too. A pull-down sprayer needs room for its hose to travel under the sink, and the handle needs space to move above it.
For a quick overview of faucet styles and what may suit your sink, see kitchen sink faucet styles.
Look beneath the sink for separate hot and cold shutoff valves. If a valve is missing, stuck, or leaking, address that before disconnecting the faucet.
A failed shutoff can turn a planned faucet change into a plumbing repair.
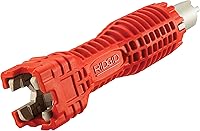
A faucet wrench can help with mounting nuts that are hard to reach. The RIDGID EZ Change Faucet Wrench has an open handle slot that clears supply lines and inserts for several common nut sizes.
Choose it if you expect tight access around the mounting nut and its shape matches your hardware. Skip it if your faucet uses unusual fasteners or a nut too large for the tool; check before relying on it, and stop if it slips on a corroded fitting.
How do you shut off water and remove the old faucet?
Close both shutoff valves, open the faucet to release pressure, and catch leftover water in a bucket. If the valves do not stop the flow, don’t disconnect the lines.
Turn each valve clockwise by hand, without forcing it. Open the faucet handle to drain water from the lines, then place a bucket below the connections and protect the cabinet floor with towels.
Disconnect the supply lines from the shutoff valves. Loosen the mounting hardware from below while supporting the faucet above so it does not twist or drop.
Lift out the old faucet and clean debris or old sealant from around the opening. Keep the old parts nearby until the new faucet is installed in case you need to compare a fitting or mounting piece.
If a nut will not move, use a wrench that fits and work carefully. Don’t cut or pry near supply pipes, electrical wiring, or the sink surface.
If corrosion makes removal unsafe, pause and get help.
How do you prepare and mount the new faucet?
Clean and dry the mounting area, then follow the faucet instructions for its gasket, deck plate, and mounting hardware. Place the faucet through the correct opening and secure it from below without letting the base shift.
The Moen Haelyn is a single-handle, deck-mounted pull-down faucet. It includes a deck plate and flexible supply lines with 3/8 in compression fittings, so check that those fittings match the shutoff valves before starting.
This faucet may suit a sink where the included plate covers unused holes and the connections match. Skip it if your layout or under-sink clearance does not fit its mounting and hose path.
Its hose is 68 in long, but the space below the sink still needs to let it move freely.
If the instructions call for putty, confirm that it is safe for the sink material. Oatey Plumbers Putty is described for natural surfaces such as granite, marble, and quartz, and it stays flexible.
Use it only when the faucet instructions call for putty and your sink surface is compatible. Skip it when the faucet seals with a gasket or calls for another sealant.
Applying putty by default can create cleanup or surface problems.
If the faucet uses a deck plate, position its gasket or seal in the order shown in the instructions. Feed the faucet connections and sprayer hose through the opening without twisting them.
For a closer explanation of when a plate helps, read what a kitchen faucet deck plate is.
From below, install the mounting washer and nut in the specified order. Tighten until the faucet is secure, but don’t over-tighten or use the faucet body as a lever.
Check from above that the base is straight and the handle moves without hitting a wall or backsplash.
How do you install a kitchen faucet with a deck plate?
Center the deck plate over the sink holes and use its gasket or seal as the instructions show. The plate covers extra openings when the faucet base does not cover the full hole layout.
Keep the plate level while feeding the faucet through its mounting opening. If it rocks or leaves a gap, check for debris or a misplaced gasket before tightening the faucet.
Don’t add putty unless the instructions require it.
How do you connect the supply lines?
Match each faucet connection to the correct shutoff valve, and route the lines without crossing, twisting, or stretching them. Start threaded fittings by hand so they do not cross-thread, then tighten them as directed by the faucet and line instructions.
Check the fitting types at both ends before choosing replacement lines. The PROCURU Braided Supply Lines are 24 in long, with a 3/8 in compression inlet for a shutoff valve and a 1/2 in FIP outlet for a faucet.
These lines suit a setup with matching connections and enough reach. Skip them if either fitting differs or the route needs a different length.
Measure from each shutoff valve to its faucet connection, allowing a gentle curve rather than a taut line or tight bend.
Keep hot and cold lines on the correct sides and follow any labels on the faucet. Connect a pull-down hose as instructed, leaving room for it to travel without catching on stored items or pressing against pipes.
Don’t force mismatched fittings together or expect tape to make incompatible connections seal. Find the correct line or adapter before restoring water.
How do you test the faucet for leaks?
Open the shutoff valves slowly, then inspect every connection while water runs through the faucet. Dry the joints first with a paper towel so a small leak is easy to spot.
Turn on hot and cold water separately, then together. Check the shutoff valves, faucet connections, and sprayer hose connections beneath the sink.
Move the handle through its range and pull the sprayer hose out and back.
If a joint leaks, shut off the water before checking the connection. A continuing drip can point to a damaged washer, a mismatched fitting, or a connection that started crooked.
For leaks that persist, see how to fix a dripping kitchen faucet.
What are common kitchen faucet installation mistakes?
The most common problems come from a poor fit check, forced connections, or skipped leak inspection. A few simple checks before tightening can prevent damage and a repeat installation.
- Ignoring the hole pattern: Count and measure the openings, then confirm whether the faucet needs a deck plate. If you have one opening, compare your setup with this guide to single-hole kitchen faucets.
- Forcing shutoff valves or fittings: Turn valves by hand and start threaded connections gently. Stop if a valve leaks or the fittings do not match.
- Over-tightening the mounting hardware: Tighten enough to secure the faucet while keeping the base aligned. Too much force can shift the faucet or stress the mounting parts.
- Using sealant without checking the instructions: A faucet may use a gasket instead. Use putty only when called for and when the sink material is compatible.
- Skipping the hose movement check: Pull the sprayer hose out and return it before filling the cabinet with supplies. Adjust its route if it catches or rubs against something.
If the faucet becomes loose after installation, check that the mounting hardware is seated and tightened correctly. The guide to tightening a loose kitchen faucet covers common causes and next steps.
Which supplies should you choose for your installation?
Choose each tool or part to match the faucet, sink, and existing plumbing. The wrench helps reach mounting nuts, replacement lines connect compatible fittings, and putty is useful only when the instructions call for it.
Pick the RIDGID wrench if its openings fit your mounting hardware and under-sink access is tight. Choose the PROCURU lines when both fittings and the 24 in length suit your route.
Consider the Oatey putty only if the faucet calls for it and your sink surface is compatible.
The Moen Haelyn may be a fit if you want a single-handle pull-down faucet with an included deck plate, soap dispenser, and supply lines, and its fittings and layout match your sink. Skip it if the installation requires different connections or the hose cannot move freely beneath the sink.
How do you decide whether to install it yourself?
Do the replacement yourself if the sink fit, shutoff valves, and connections are straightforward and you can reach the mounting hardware safely. Call a plumber if a valve leaks, pipes move when fittings are tightened, or corrosion prevents safe removal.
Before choosing a faucet, match its hole layout and fittings to your setup. For installation, follow its instructions, avoid forcing parts, and test every connection with the water running.
For a final check on how to install a kitchen faucet, remember the decision rule: proceed when the faucet fits and the plumbing is sound; pause for help when a valve, pipe, or connection is damaged or incompatible. If you find a leak after the job, use the guide to fix a dripping kitchen faucet.
Frequently asked questions
Can I install a kitchen faucet myself?
You may be able to install a kitchen faucet yourself if the shutoff valves work, the sink opening matches the faucet, and you can reach the mounting hardware. Follow the faucet instructions and stop if a valve leaks, a pipe is damaged, or the connections don't match.
Do I need plumber's putty to install a kitchen faucet?
Not always. Some faucets use a gasket or deck plate, and the installation instructions will say what seal is needed.
Use plumber's putty only when the faucet instructions call for it and the sink material is compatible; some stone surfaces need a different sealant.
How long does it take to install a kitchen faucet?
The time depends on access, the old faucet's condition, and whether the new faucet fits the existing holes and supply connections. A straightforward replacement may take a few hours, while corroded mounting nuts, stuck shutoff valves, or mismatched fittings can add time.
Should I replace supply lines when installing a faucet?
Replace supply lines if they are damaged, corroded, the wrong length, or incompatible with the new faucet. Check the faucet instructions and measure the route to the shutoff valves before choosing lines; don't stretch, kink, or force a connection.